Uploading videos & images to Firebase Storage
Hello there!
In this video, we learn how to use Firebase Storage to save images and videos with React Native. We also create a beautiful design to manage our files.
It's amazing the level of development that we can achieve with Firebase, especially as solo developers. We can easily add authentication, a database, storage, and much more. If you are interested in learning more about Firebase with React Native, we have plenty of projects here at Code with Beto. Or even better, you can enroll in our React Native Course
Design
This app design was provided to me by the design team at Eco Studios. Here is the design if you want to play with it 👉🏼 Figma Design.
Requirements
Prepare the project
- Init the project
npx create-expo-app tutorial-storage cd tutorial-storage- Install dependencies
expo-av: To work with video and audio in expo.firebase: To save data and files on the server.expo-dev-client: To work with third party libraries outside expo.expo-image-picker: to select images.@react-native-comunity/blur: effect of blur.
npx expo install expo-av firebase expo-dev-client react-native-svg expo-image-picker @react-native-community/blur- Prebuild
npx expo prebuildnpx expo run:iosIf you want to run this on android, run the following command.
npx expo run:androidConnect firebase to the app
- Add the name of the app
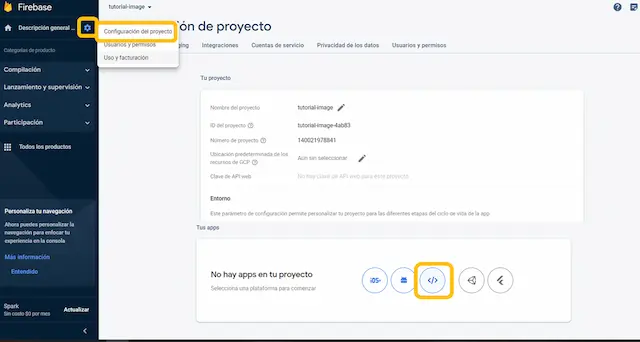
- Create a name of the app, be careful with your credentials.
- Configure metro.config.js with firebase
const { getDefaultConfig } = require("@expo/metro-config");

const defaultConfig = getDefaultConfig(__dirname);
defaultConfig.resolver.assetExts.push("cjs");
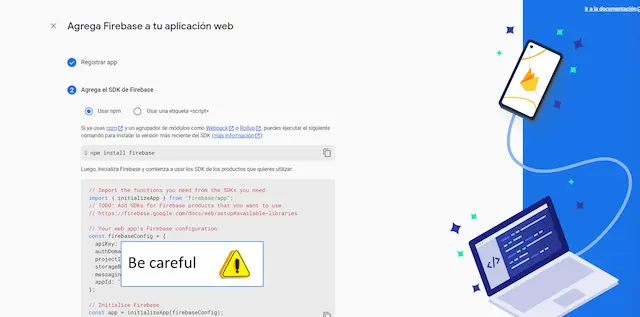
module.exports = defaultConfig;- FirebaseConfig.js expo config firebase
import { initializeApp } from "firebase/app";
import { getStorage } from "firebase/storage";
import { getFirestore } from "firebase/firestore";

const firebaseConfig = {
  apiKey: "",
  authDomain: "",
  projectId: "",
  storageBucket: "",
  messagingSenderId: "",
  appId: "",
};

const app = initializeApp(firebaseConfig);
export const storage = getStorage(app);
export const db = getFirestore(app);Empty Gallery
Download SVG - Download it.
React-svgr - Use React SVGR to transform the svg into a React Native Component and paste it at assets/SVG.js
Progress Bar
import React from "react";
import { View } from "react-native";
import Svg, { Rect } from "react-native-svg";

export default function ProgressBar({ progress }) {
  const barWidth = 230;
  const progressWidth = (progress / 100) * barWidth;

  return (
    <View>
      <Svg width={barWidth} height="7">
        <Rect
          width={barWidth}
          height={"100%"}
          fill={"#eee"}
          rx={3.5}
          ry={3.5}
        />
        <Rect
          width={progressWidth}
          height={"100%"}
          fill={"#3478F6"}
          rx={3.5}
          ry={3.5}
        />
      </Svg>
    </View>
  );
}Blur View for uploading
First we need background view
import {
  Image,
  Text,
  StyleSheet,
  View,
  Button,
  TouchableOpacity,
} from "react-native";
import { BlurView, VibrancyView } from "@react-native-community/blur";
import ProgressBar from "./ProgressBar";
import { Video } from "expo-av";

export function Uploading({ image, video, progress }) {
  return (
    <View
      style={[
        StyleSheet.absoluteFill,
        {
          alignItems: "center",
          justifyContent: "center",
          zIndex: 1,
        },
      ]}
    >
      {/* Background blur */}
      <VibrancyView
        blurType="ultraThinMaterialDark"
        style={StyleSheet.absoluteFill}
      ></VibrancyView>
      {/* // Content blur */}
      <BlurView
        style={{
          width: "70%",
          alignItems: "center",
          paddingVertical: 16,
          rowGap: 12,
          borderRadius: 14,
        }}
        blurType="light"
      >
        {image && (
          <Image
            source={{ uri: image }}
            style={{
              width: 100,
              height: 100,
              resizeMode: "contain",
              borderRadius: 6,
            }}
          />
        )}
        {video && (
          <Video
            source={{
              uri: video,
            }}
            videoStyle={{}}
            rate={1.0}
            volume={1.0}
            isMuted={false}
            resizeMode="contain"
            // shouldPlay
            // isLooping
            style={{ width: 200, height: 200 }}
            // useNativeControls
          />
        )}
        <Text style={{ fontSize: 12 }}>Uploading...</Text>
        <ProgressBar progress={progress} />
        <View
          style={{
            height: 1,
            borderWidth: StyleSheet.hairlineWidth,
            width: "100%",
            borderColor: "#00000020",
          }}
        />
        <TouchableOpacity>
          <Text style={{ fontWeight: "500", color: "#3478F6", fontSize: 17 }}>
            Cancel
          </Text>
        </TouchableOpacity>
      </BlurView>
    </View>
  );
}Pick Image or video
expo-image-picker allows you to pick image and video.
import * as ImagePicker from "expo-image-picker";
async function pickImage() {
  let result = await ImagePicker.launchImageLibraryAsync({
    mediaTypes: ImagePicker.MediaTypeOptions.Images, // here it is where we specify the allow format
    allowsEditing: true,
    aspect: [3, 4],
    quality: 1,
  });

  if (!result.canceled) {
    setImage(result.assets[0].uri);
    // to upload image see the next function
    await uploadImage(result.assets[0].uri, "image");
  }
}Uploading Image
First let's undestand what is a blob in javascript ? In JavaScript, a Blob (Binary Large Object) is a data structure that represents a collection of binary data. It can store different types of data, such as text, images, audio, or video.
Think of a Blob as a container that holds any kind of binary data. It doesn't have any specific format or interpretation. It's just a way to encapsulate binary data in a single object
async function uploadImage(uri, fileType) {
  const response = await fetch(uri);
  const blob = await response.blob();
  const storageRef = ref(storage, "Stuff/" + new Date().getTime());

  const uploadTask = uploadBytesResumable(storageRef, blob);

  // listen for events
  uploadTask.on(
    "state_changed",
    (snapshot) => {
      const progress = (snapshot.bytesTransferred / snapshot.totalBytes) * 100;
      console.log("Upload is " + progress + "% done");
      setProgress(progress.toFixed());
    },
    (error) => {
      // handle error
    },
    () => {
      getDownloadURL(uploadTask.snapshot.ref).then(async (downloadURL) => {
        console.log("File available at", downloadURL);
        // save record
        await saveRecord(fileType, downloadURL, new Date().toISOString());
        setImage("");
        setVideo("");
      });
    },
  );
}Save references in firestore
After getting the urls of the files, it is necessary to save them in the database to access them later.
async function saveRecord(fileType, url, createdAt) {
  try {
    const docRef = await addDoc(collection(db, "files"), {
      fileType,
      url,
      createdAt,
    });
    console.log("document saved correctly", docRef.id);
  } catch (e) {
    console.log(e);
  }
}Subscribe to realtime updates of the files.
useEffect(() => {
  const unsubscribe = onSnapshot(collection(db, "files"), (snapshot) => {
    // listen to changes in the collection in firestore
    snapshot.docChanges().forEach((change) => {
      if (change.type === "added") {
        // if a new file is added, add it to the state
        console.log("New file", change.doc.data());
        setFiles((prevFiles) => [...prevFiles, change.doc.data()]);
      }
    });
  });

  return () => unsubscribe();
  // It is a good practice to unsubscribe to the listener when unmounting.
  // Because if you don't, you will have a memory leak.
}, []);FlatList
Show the files in a perfomant way with Flatlist API from react native
<FlatList
  data={files}
  keyExtractor={(item) => item.url}
  renderItem={({ item }) => {
    if (item.fileType === "image") {
      return (
        <Image
          source={{ uri: item.url }}
          style={{ width: "34%", height: 100 }}
        />
      );
    } else {
      return (
        <Video
          source={{
            uri: item.url,
          }}
          // videoStyle={{ borderWidth: 1, borderColor: "red" }}
          rate={1.0}
          volume={1.0}
          isMuted={false}
          resizeMode="cover"
          shouldPlay
          // isLooping
          style={{ width: "34%", height: 100 }}
          useNativeControls
        />
      );
    }
  }}
  numColumns={3}
  contentContainerStyle={{ gap: 2 }}
  columnWrapperStyle={{ gap: 2 }}
/>To elevate your Flatlist skills to a professional standard, explore this insightful video: New FlashList ⚡️️. Further, enrich your knowledge by participating in our React Native Course.
Links
Go back to Projects
Support Our Community
Take your skills to the next level by enrolling in our courses!
React Native CourseMaster React with TypeScriptMaster Git & GitHubYour support helps us continue creating valuable resources for everyone. ❤️